Thursday, August 14, 2014

Fixing Your Faucets Before Replacing Them


            Many bathroom and kitchen faucets are built to last, but nothing can last forever.  Many times when there is a problem with a faucet-if it is leaking or some part of it is broken-it can usually be fixed with some sort of replacement part.  There are washers, o-rings, screws, and many other small parts that can be replaced to fix a broken faucet.  These parts are most commonly used to fix faucets that are leaking-whether it be a handle or the faucet spout.  Sometimes the problem may be something that is a little bigger-such as the handle itself, the faucet spout, or a sprayer unit.  When looking for a solution to the problem, you may have to take the faucet apart in order to know what needs to be replaced.
            Taking apart a faucet can be a challenge, depending on what type of fixture you are dealing with.  When you are taking the faucet apart, it is important to make sure you are doing so in an organized manner.  Some handles, spouts, and sprayer assemblies will have a number of small parts inside of them-like washers, o-rings, etc.  When you are taking apart these different parts, the small parts may fall out-making it difficult for you to know where each part fits.  If possible, find out the brand and model of faucet that you have.  If you are able to find out what faucet you have, you can go in the internet to the manufacturer’s website.  Most of these sites have a resource called the “exploded parts view” document that will show you each part of the faucet and where it fits.  Many of these also have the model numbers of the different parts so that you can find the replacement part that you need.


            A common problem with faucets is that the o-rings or washers will become worn and their ability to create a seal will fail.  This will result in a leak in the part of the faucet where they are installed (whether it be the spout, sprayer, or handle).  Other times, screws will become rusty which can make them brittle and as they are being tightened or loosened they can snap in half.  Other things can happen (such as kinds messing around in the bathroom where they shouldn’t be playing at all) and the handle or other part of the faucet will break.  There are many replacement handles that can be purchased to fix these problems as well.  Buying a replacement part will save you money, especially if you are buying a small washer as compared to purchasing a new faucet entirely.
            There are many other parts to faucets that I haven’t mentioned that can be replaced.  Finding out which part is causing the problem is half the battle.  Once you have determined the cause of the problem, it should be fairly easy to find a replacement part (if your faucet isn’t extremely old).  Once you have the parts, you should be able to get your faucet fixed and running in no time!  If you already know what part you need, find it here.  

Monday, June 30, 2014

Popcorn Ceiling

The first house I bought had that old popcorn ceiling. Some people may like that stuff but to me it doesn’t add appeal to a house. One of the first things I did (before moving in) is remove that ugly ceiling. Here is a How To of what I learned through the years. 

Step 1: Prepare the Room


The first thing you want to do is remove all furniture and items from the room. Clear it completely.  Then you will use two millimeter plastic sheets to seal off the entire room. Hang them from the very top of the wall or from the crown molding if that applies.  Using a window fan is a great way to add extra ventilation.  Also, add a drop cloth with a waterproof backing to cover the entire floor. Note: if your popcorn ceiling was added before 1979 you will need to get it tested for asbestos.

Step 2: Spray the Ceiling

Spraying the ceiling softens the texture and will help break down the adhesive which will make it easier to scrape off. You can use a basic garden sprayer or anything of that sort. You will want to work in a 5 feet square area. You don’t want the ceiling to absorb too much water and damage the paper surface and wallboards underneath.


Step 3: Scrape the Ceiling

After you spray a 5 feet square area, wait 10-15 minutes for the water to soak in. You will then start scraping it off with a ceiling texture scraper. A smaller putty knife is a great way to scrape off the corners and around the crown molding.  

For more great home improvement ideas visit: http://www.diynetwork.com/

Thursday, June 19, 2014

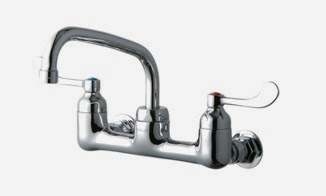
Utility Faucets: Not Just for Washing Clothes


            I like the outdoors.  I like to go camping, hiking, fishing, and other activities that can be pretty messy.  Sometimes after coming home from my outdoor adventures, the truck wouldn’t be the only thing caked in mud.  My clothes and shoes would get so dirty sometimes that you couldn’t tell what color either of them were underneath the dirt and mud.  A lot of the times I could just change my clothes and beat the mud off of my clothes and shoes, but that didn’t get everything off of them.  My wife had to let my pants soak and scrub off the majority of the mud that was left on them.  I would clean my shoes (my wife didn’t want to come near them since they usually smelt so bad).
            Since I didn’t want to use the kitchen sink to do all this, I would use the laundry room sink/faucet.  With all the stuff that I was cleaning off, I often clogged the sink drains and my shoes started to scratch the sink.  Sometimes it was hard to get the utility faucet we had to reach the clothes and other things that I needed to get clean.  After many years of doing this, my wife and I discussed it and we decided that it would be best to set up a cleaning station for our outdoor adventures out in the garage.
https://www.plumbersstock.com/category/72/utility-room-faucets/

            We found a new sink to go in the laundry room and took the old one out to the garage.  Since we liked to go fishing as a family and eat the fish that we caught, we also decided to get a garbage disposal installed in the garage set-up as well.  To better clean the fish out and the dirty clothes that I would bring home, we got a wall mount utility faucet that had a longer spout on it.  The water put out by the faucet also was better than the small faucet we had in our laundry room.  This made it easier to clean clothes, boots, fish, and other game animals I needed to clean out.  Since the sink was our old one, we didn’t really care about how scratched up it would get.
            Ever since we decided to install this new set-up, everyone has been much happier.  I didn’t have to spend time unclogging the sink drains, my wife didn’t have to deal with me tracking mud in the house and getting the laundry room dirty, and fish guts didn’t have to be cleaned with the backyard hose.  We have also used the garage set-up for other things as well.  At the end of the summer once all the potted flowers have died, my wife uses it to clean out her flower pots so they’ll be ready for the next year.  When I have done work on our vehicles, I don’t have to worry about getting oil and grease all over the door and doorknob when going inside to clean my hands.  These faucets aren't just for washing clothes!

Thursday, May 29, 2014

Venting Your Home With Flex Duct


When building a new home, it is important to make sure that everything is installed correctly and that the right parts are used.  One of the important things to do is to make sure that the central air system is installed correctly.  The air system consists of different components and each with their specifics as how they should be installed and other parts that need to be used with them.  One of the most important components of central air systems is the venting that will run throughout the home.  The majority of this system is covered by the finished walls and drywall.  One small part of the venting system that can be seen is where the dryer is hooked up.
The venting for the dryer needs to run outside of the home so that the lint that collects in the dryer will not get into the rest of the venting system.  The dryer isn’t the only appliance that needs to vented outdoors.  Any bathroom fan and some range hoods are things in the home that need to be vented outside of the home to avoid problems.  When installing these parts in a home, many times there are in areas where the standard rectangular venting can’t be installed very easily.  In these cases, the use of flex duct comes in handy.

Like the name says, this type of duct is flexible and can be ran around corners, tight spaces and other unsymmetrical architecture.  Flex duct is designed to fit on the appliances already mentioned (dryers, bathroom fans, and range hoods).  The size of the connections on these appliances are smaller than the standard venting size and so flex duct is made to fit on them.  If you have ever hooked up your dryer to the vent coming out of your wall, then chances are that you purchased some sort of flexible duct to hook it up.
If you are building a home and are thinking about using flex duct while hooking up venting for these appliances, it is important that you use the correct type of tape so connect it to the venting system.  The correct tape to use is called aluminum tape.  It is designed to be durable so it will last for many years, while holding the duct in place, ensuring that your home is being properly vented.  It is a misconception that regular duct tape can be used.  Just because the word “duct” is in the word, doesn’t mean that it can be used in this application.  If duct tape is used on this type of flexible piping, you will definitely have problems in the long run.  The adhesive used on duct tape, over time, starts to crack and will become loose.  This will cause the venting, as expected, to become detached and harmful particles can be introduced into the vents that cool or heat your home.  
Whether you are hooking up a dryer, bathroom fan, or range hood, visit Plumber’s Stock to see some options that are available.

Monday, March 31, 2014

Cooling Your Home


            The first day of spring has come and gone, but the warm weather is only just beginning, especially in states that are further south and that are considered desert states.  There have been a few days the past week or so that have been so warm, that we decided to open the windows to help cool off the house.  Soon the days will come that opening the window won’t be much help and we will need to get the AC going again.  Since we live in a dry climate, we own an evaporative cooler, or a swamp cooler, the name that it is more commonly referred to.
            There are many advantages having a swamp cooler, but it if you are want to install one, it is important to make sure that your home and the area you live in provide the right conditions.  If you live in a place that that generally has cooler weather such as the Northwest, there are different systems on the market that will serve your cooling needs better.  Also, if you live in an area that has a lot of humidity, then an evaporative cooler isn’t a good choice for you.  The way this type of cooler works, is not compatible with humid conditions and will be useless if installed.  So what are the conditions that are ideal for this type of AC unit?
            If you live in an area that is very hot and very dry (low humidity) then a swamp cooler may be a good choice for you.  The states that border Mexico are usually the states where most swamp coolers are sold since they are dry and hot.  This type of AC unit is inexpensive when compared to the alternatives (such as a central air system).  They are also more efficient than other AC units, using about 70% less energy than the other options that are available.  This, in turn, can be considered to be a more green option than other AC units on the market.

            There may be a few disadvantages, however.  For example, if you are trying to cool down a large home, one unit may not be enough to get the job done.  Evaporative coolers are more efficient in smaller homes, duplexes, and apartments.  Also, there is some upkeep that have to do with these coolers.  Before winter comes, they need to be disconnected from the water line (if there is one) and if they aren’t, it will freeze and can cause damage to the unit.  Many units also require that one or more filters be used with it, meaning that these filters will need to be switched out regularly.  If not done correctly, the air that is produced by them may not be safe for people to breathe.

            Although there may be some drawbacks, they are little things that can easily be done and you will be able to save money in the long run.  Swamp coolers are also designed so that they can be installed on the roof or they also come in a window unit.  For a good price on a cooler, visit: https://www.plumbersstock.com/category/554/evaporative-coolers/

Monday, March 24, 2014

Filters

Even though you may not realize it, many systems in your home that are there for convenience and to make your life easier require some sort of filter for them to function properly.  Filters are found in plumbing, irrigation, and cooling & heating applications.  When you are using water, a central air system, or a sprinkler system-there is a chance that there is some sort of filter helping that equipment to run correctly.
In areas where water is in short supply or where droughts are happening continually, the water that is available can contain sediment or other particles that wouldn't be found in an area where water is plentiful.  If the water is being used for drinking, it is a good idea to have a filtration system installed somewhere in the home.  One of the most common places to have this filter is underneath the kitchen sink.  A filter “housing” (a canister like part) is installed where water will pass through so that the water can be filtered.  The housing has two major parts to it: the top where the inlet and outlet for the water is and the bottom that screws into the top.  This is where the filter goes.  The bottom can be taken off pretty easily so that the filter can be replaced and water can continue to be cleaned.
Drinking water is also filtered as it passes through a refrigerator that has water dispensing capabilities.  It also filters the water that is taken into the ice maker so that the ice that is being made doesn’t contain “floaties”.  This technology has also been applied to drinking fountains that are found in some public places.
In some irrigation and sprinkler systems, the water comes from wells or other sources where

the water contains rocks and other debris that can clog up the pipes, system valves, or the sprinkler heads that are being used.  To avoid these problems it is a good idea to install a filter designed specifically for these types of systems.  They also have some type of housing and will be installed somewhere along the water line.  Where and how it is installed will be determined by the type of system the filter will be used in.
The air that goes through a central air system, whether it be to warm up or cool down the place where it is installed, needs to be filtered.  If the air isn't filtered, harmful debris and some disease causing organisms can be spread to the areas where the air is being dispersed.

In all of these different applications, there are a wide variety of filters available.  Some of them are as simple as only filtering out a single particle, while others are designed to remove more than one particle and some chemicals that can be found in air and water.  The filters used in different applications are also made of different materials.  Some are made out of plastic and soft materials, while others are made from metal so they can withstand more pressure and materials that are considered to be harsh. 

Friday, February 28, 2014

American Standard Bathroom Sink Review

In my house there are three bathrooms. I don’t really care about how they look as long as the plumbing is correct and everything is working. I just get in to get the job done and get out. But my wife thinks that bathrooms have to look nice. I’m not sure what that means but I don’t argue.

Recently she wanted to update our guest bathroom. I thought it looked fine but she insisted. She wanted new faucets and tile. She wanted an update on the paints and the decorations. I just handle the plumbing part of things and she does the rest.  My wife got it in her head she needed a new sink for that bathroom. 

We looked around at your basic sink but she wanted something a little fancier. There are a variety of sinks on the market now days.  They come in almost any color and materials such as vitreous china, fireclay, enameled cast iron, acrylic sinks and even tempered glass.  If you are looking for bold colors Enameled sinks come in all shades as well as earth tones and grays. As we were looking I was surprised to see stainless steel sinks becoming more and more popular in the bathroom. My wife is much more tradition material and color. After looking around for weeks we settled on an American Standard bathroom sink(s).

The thing my wife loved about this sink, that she felt set it apart from a “regular” sink, was that it is an above-counter sink. It is a basin type and very spacious. I wasn't sure about it at first but after experiencing it for quite some time now, I am glad we got this sink.

We chose this sink for a few reasons. Of course my wife chose it for looks – she liked the look of it, round above-counter and all. She also liked the bowl shape with no faucet holes or overflow. I’m glad she liked it for looks but I didn't buy it just for looks.

I really like the vitreous china and the spaciousness of the basin. At first I was worried with it not having an overflow but the depth of this sink makes up for it. The faucet is not installed direction on the sink bowl.  Previously in that bathroom we had an under-counter sink; however we were replacing the counter tops with granite so that was not much of a problem. If you are considering an above-counter sink you made need to do some adjusting with some decorative plates to cover the holes.


Although above-counter sinks are becoming more popular in high-end homes and mater bathrooms, I was afraid that I would have to pay a lot more than I was wanting. I actually found a great deal on this sink that was not all that much more expensive that buying one similar to what we originally had in the bathroom.


My wife and I have had the new sink in that bathroom for a month or so now. Both of us have been pleased with our purchase and would recommend this sink to anyone looking for this particular style. 

Tuesday, February 18, 2014

Painting like a Pro


I recently repainted a few rooms in my house.  I have had some experience painting, and through the years have picked up a few tricks of the trade. If you are considering painting a room in your house here are a few things to keep in mind if you are looking for a more “professional” finish.
1.     Always use a primer. It is tempting to skip this step but a primer helps provide a good surface for the paint and it also helps bring out the paint’s true color.
2.     When painting, use an edge pad for clean lines around door-frames, ceilings and corners
3.     Choose a day to paint when the air is dry (or dryer).  Moisture in the air keeps paint from drying.
4.     To keep paint from getting in places you don’t want it, put a small plastic bag over doorknobs and tape the edge.
5.     Scrap any old paint that is coming off the walls and sand the wall smooth. You want a clean surface for the best result.
6.     Wash your walls from top to bottom. Paint sticks best to a clean surface.
7.     Once you have painted an area and it has started to dry, leave it alone. If you paint back over it, you make create marks and color streaks.
8.     Cover your floor with a drop cloth to keep from spotting up your floor.
9.     Use a roller for large walls
10.  Before you start, remove all the wall plates, tape off light switches and electrical outlets.

The pros recommend one gallon for every 400 square feet. Remember to make sure your wall is sanded, clean and dry and you are ready to paint! 

Thursday, February 13, 2014

Peerless Kitchen Faucet

When it comes to buying faucets, I do not really care about the look of them. I have a hard time spending money on something I only use to wash things that are dirty. A few weeks ago I decided it was time to change the kitchen faucet but, like I said I am not in to looks and fancy extras. I just want a faucet that gets the water off what is ever dirty, whether it is my hands, dishes or my dog.

Although I did not need or want the faucet to be fancy, I wanted a faucet that had a side spray. I know that most houses these days have a side spray or a spray built in to the faucet but I have not had one since I have been in my home a few years now. I just had no need to update my faucet when the one I had works perfectly fine.

Then I started having problems with my faucet. There was a constant leak and no matter what I did I could not get it to stop. I probably would not have cared if the leak was a drip from the faucet itself; however, the leak was at the base of the faucet which causes all kinds of problems.After a few weeks of trying everything I could, I decided it was time to look for a new faucet.
It took me awhile to find what I was looking for. I wanted something fairly inexpensive yet reliable and I found that in my peerless kitchen faucet(s). This faucet was exactly what I needed and I did not have to pay a ridiculous price for it! I have been using it for a few weeks now and could not be happier. Here are a few reasons why I decided on this particular brand and faucet.

The part of the faucet I cared least about was the finish but I am pleased that this finish is stainless steel. That makes it easier for cleaning (which I do not really like to do) and the faucet still looks nice.  I chose the single level control so I do not have to use two hands. I seem to find myself with dirty hands a lot and I do not want to have to move two levers. This lever also is very smooth as it moves side to side.

The spout swivels 360 degrees which is very convenient especially since I have a double sink. My last faucet did not have this feature and it is most annoying not to be able to move the spout where I want it and now I do not have that problem. And this particular sink came with a side sprayer. This is the first time where I have had a side sprayer in my own kitchen. I will never go back to the alternative! The side sprayer makes it easier to fill pots, clean off crusted food, clean hard-to-reach parts on the sink and the clean-up around the sink.


In all, I am very pleased with my new faucet. If you are like me and don’t care much for looks and you are not looking to pay too much for a new faucet, I recommend checking out this product.